eOrganic author:
Mark Schonbeck, Virginia Association for Biological Farming
Introduction
A cover crop planted correctly and managed well can give nearly 100% weed control while it is growing, and substantial weed management benefits in subsequent vegetables. However, a cover crop poorly managed can become a weedy mess and make a huge deposit into the weed seed bank. Following are some tips for avoiding the pitfalls and maximizing your chances for success
- Choose the right cover crop for the climate and the season
- Be sure to use high quality seed
- Prepare a good, weed-free seedbed
- Use optimum seeding depths, adequate seeding rates, and good sowing technique
- Take care of the cover crop; don’t hesitate to water, feed, or lime if warranted
- Feed the cover crop, not the weeds
- Grow a cover crop to maturity if—and only if—it is a good stand
Choose the Right Cover Crop for the Climate and Season
Sow warm season, frost-tender cover crops like soybean, buckwheat, and millet after the spring frost-free date and at least six to eight weeks before the fall frost date to ensure rapid growth and good biomass production. Cowpea (Fig. 1), sorghum–sudangrass, and most millets require really warm soil—at least 65–70°F. They may establish slowly and become weedy if sown immediately after the spring frost date when the soil is still cool, but they will grow rapidly and overwhelm most weeds if sown later when the soil and weather are really warm.
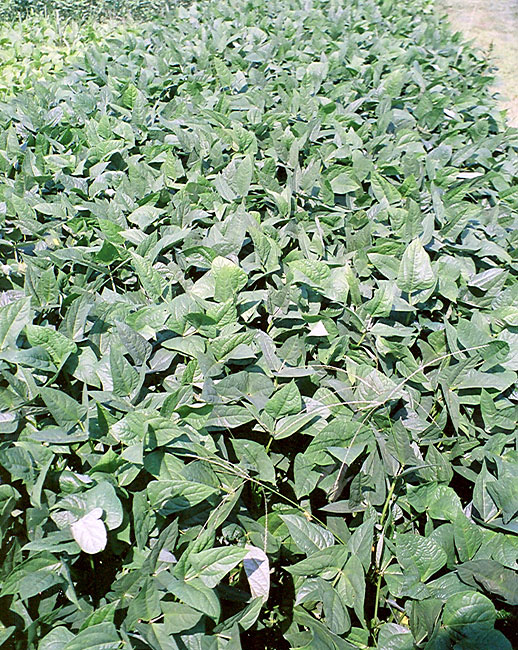
Figure 1. Cowpeas planted in June or July when the soil is thoroughly warm can look like this within five or six weeks after planting, even in fields with fairly heavy weed pressure such as this one. However, cowpeas planted just after the spring frost date, when the soil is still fairly cool, can emerge slowly and sporadically, giving weeds the upper hand. Figure credit: Mark Schonbeck, Virginia Association for Biological Farming.
Sow cool season crops like oats, field peas, bell beans, and forage radish in early spring when cool moist soil conditions favor rapid growth. Plant winter annuals like cereal rye (Fig. 2), wheat, winter barley, vetches, crimson clover, and Austrian winter peas at the end of summer or in early fall, giving them time to put on about 4–6 inches of growth before winter freezes render them dormant. Avoid planting any cool-weather cover crops at a time that will expose them to summer heat (daily highs of 85°F or more) before they approach full height. Heat retards their growth and lets summer annual weeds break through.
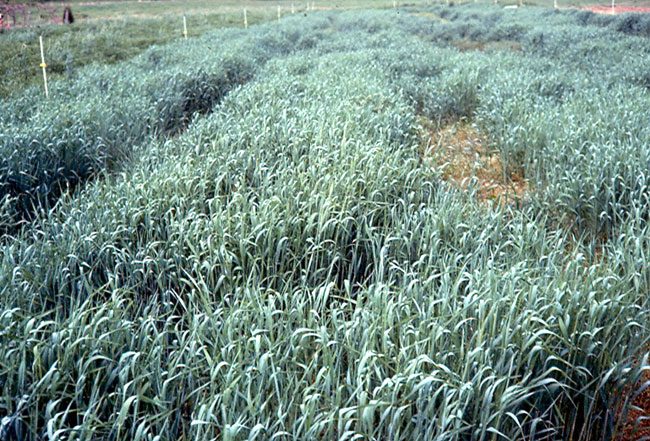
Figure 2. Winter rye (cereal rye) can be planted as late as November 1 in hardiness zone 7 and still give a fairly good stand like this by late April. However, bicultures of winter rye with winter annual legumes like hairy vetch should be planted about a month earlier so that the legume can get established sufficiently to overwinter well. Figure credit: Mark Schonbeck, Virginia Association for Biological Farming.
Be Sure to Use High Quality Seed
Even a day’s delay in cover crop establishment that results from weaker seed can give the weeds a chance to get a foothold. Patchy stands from poor quality seed can defeat the purpose of cover cropping altogether (Fig. 3).
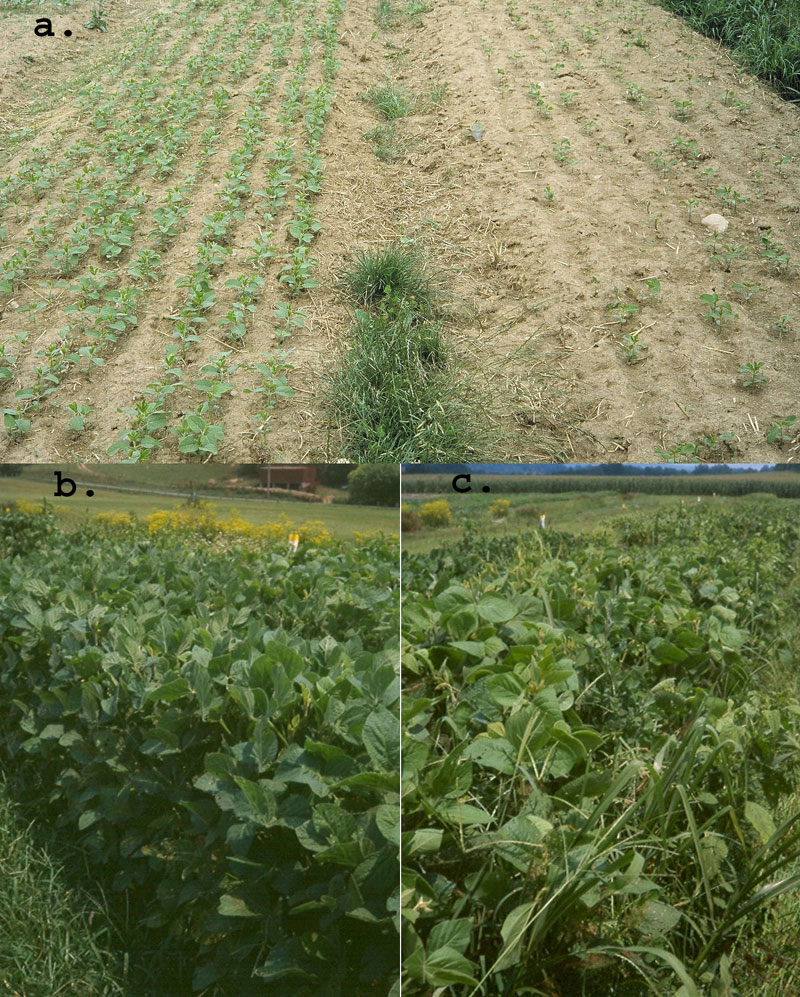
Figure 3. In this cover crop variety trial, one seed lot of forage soybean was of poor vigor and gave a spotty stand (a). Forage soybeans from good seed yielded a high biomass, nearly weed-free stand (b), whereas the low vigor seed gave a weedy stand (c). Figure credits: Mark Schonbeck, Virginia Association for Biological Farming.
Use current-year seed from a reputable source for cool season cereal grains, buckwheat, and soybeans. High quality pea, bell bean, cowpea, millet, and sorghum–sudangrass seed that is properly stored (kept cool and dry) can be used for two or three years; vetches and clovers can last up to five years. When in doubt, get new seed.
Prepare a Good, Weed-free Seedbed
Be sure to remove weed competition before sowing a cover crop. In addition to removing top growth of any existing weeds, seedbed preparation should include chopping up or otherwise disrupting the rhizomes, rootstocks, and other belowground structures of of perennial weeds. Also, be sure that thousands of weed seeds are not germinating just below the surface when you plant the cover crop. The final shallow tillage to finish the seedbed should take place minutes or hours—not days—before planting. Planting into an apparently clean seedbed prepared two to five days earlier can result in a weedy cover crop (Fig. 4). Broadcast seeding followed by shallow tillage to incorporate the seed is one way to knock out weed seedlings in the white thread stage and plant the cover crop in one pass.
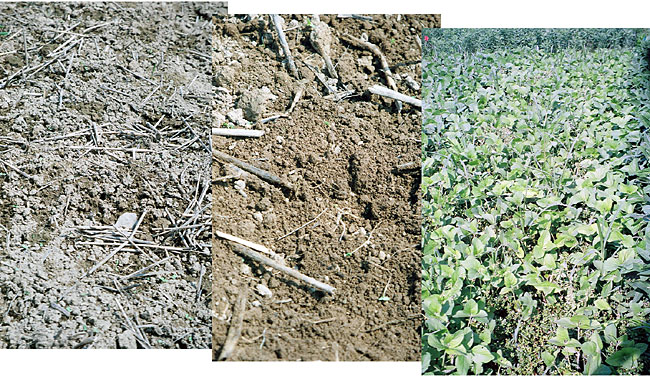
Figure 4. Never drill a cover crop into a seedbed that was prepared several days earlier, regardless of how clean it looks, unless you are prepared to flame-weed or rotary hoe before the crop emerges. This seedbed, prepared five days prior to this photograph, looked fairly "clean" at a glance (a), but light stirring of the soil surface reveals numerous tiny weed seedlings in the white thread stage (b). Cover crops, including the vigorous forage soybean shown here, became infested with weeds when planted in a seedbed prepared five days before planting (c). Figure credits: Mark Schonbeck, Virginia Association for Biological Farming.
Work the soil surface sufficiently to give good seed–soil contact. Usually, it is not necessary to pulverize the soil to sow a cover crop, and such rough treatment is bad for soil quality. If weed pressure is minimal and crop residues are not too heavy, no-till planting with a good no-till drill can give sufficient seed–soil contact.
Use Optimum Seeding Depths, Adequate Seeding Rates, and Good Sowing Technique
Cover crop–weed competition is a race that you want the cover crop to win! Remember that most cover crops emerge as large seedlings—many times larger than most weeds, which gives them an initial advantage. However, weed seedlings double their size in fewer days than large seeded crops, and will begin closing the gap—unless and until they are shaded out by cover crop canopy closure. A heavy, even stand is essential. Individual cover crop seedlings should be fairly uniformly distributed across the field, and close enough together so that they will intercept most of the incident light and their roots will occupy most of the soil volume within a few weeks after planting (Fig. 5).
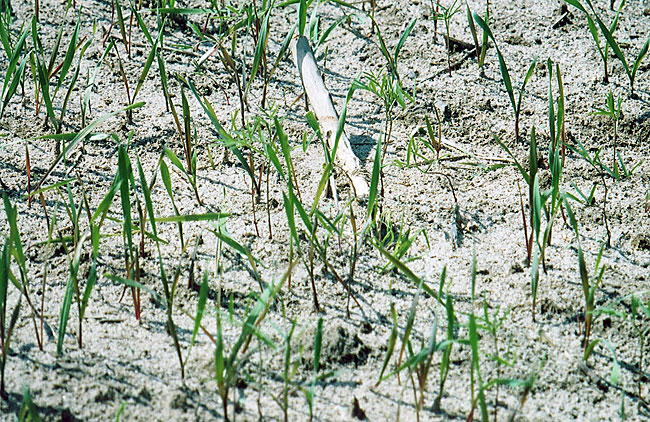
Figure 5. This rye–hairy vetch cover crop was skillfully broadcast by Virginia farmer Charlie Maloney using a manually operated spin seeder. Immediately after broadcasting, he rototilled shallowly to incorporate the seeds into the top inch, simultaneously knocking out any newly-germinated weeds. Any later-emerging weeds will have little chance in this dense, uniform cover crop stand, photographed here 11 days after planting. Figure credit: Mark Schonbeck, Virginia Association for Biological Farming.
Use recommended seeding depths for each cover crop species. In warm, dry conditions, go a little deeper (up to 50% deeper); in cool wet conditions go a bit less deep. Planting large seeded crops too close to the surface, or small seeded crops too deep, can result in poor stands.
Be sure to plant enough seed! Never try to stretch cover crop seed by sowing at lower than recommended rates. Increase rates to 1.5, 2, or even 3 times recommended rates (if economically feasible) when weed pressure is heavy; when soil fertility, seedbed, or planting dates are not quite optimum; or when seed quality may not be optimum or germination percentages are below 85%.
Use good sowing technique for uniform stands. Broadcasting seeds evenly with a manually operated or tractor mounted spin seeder, followed by shallow incorporation to the desired depth with rotary tiller, harrow, or other implement, can give the most uniform stands that rapidly shut out weeds (Fig. 5). Drilling in closely spaced rows (5–6 inches apart) is a close second. Simply broadcasting seed on the soil surface can lead to thin or patchy stands, unless good rains or diligent irrigation keep the seed moist until the crop is established, and seed-eating birds and ground beetles are scarce. For overseeding cover crops into standing vegetables, either use a drill or multirow push seeder between rows, or broadcast seed just prior to the last cultivation for weed control, which will also incorporate the cover crop seeds.
Take Care of the Cover Crop; Don’t Hesitate to Water, Feed, or Lime if Warranted
While cover crops are less fussy than most vegetables, they do need water, nutrients, and reasonable soil tilth and pH (acidity) to grow vigorously and get the jump on weeds.
If the soil is dry and it is at all feasible to water a newly-planted cover crop, do it! One sprinkler irrigation may be all it takes to get a drought-tolerant summer cover crop like cowpea, sunnhemp, millet, or sorghum–sudangrass established. Most cool season cover crops are less drought hardy and depend on spring or fall rains to thrive. End-of-summer plantings of oat, field pea, and/or bell bean may be particularly difficult to establish in dry seasons; try barley, radish, or mustards instead.
If a subsurface hardpan is present, break it with a chisel plow or subsoiler before planting a cover crop. A severe hardpan will even block sweetclover and radish roots, reduce cover crop vigor, and favor those weeds that tolerate compaction. If the hard layer is fractured before planting, cover crop roots can penetrate and open the soil profile for future cash crops.
If soil pH is very low (acid—5.5 or lower) or high (alkaline—8.0 or higher), apply limestone or acidifying amendments, respectively. Since limestone takes a year or two to correct acid soil pH, start with acid-tolerant cover crops like oat, buckwheat, cereal rye, hairy vetch, and cowpea. Barley, brassica family, sweetclover, and woolypod vetch do well on somewhat alkaline soils.
It may be appropriate to spread aged manure, compost, and/or slow-release organic fertilizer before planting a cover crop. Make sure that the materials to be used do not carry a lot of weed seeds. Feeding a cover crop is an excellent way to use manure that has not been hot-composted in certified organic operations, which require a 120-day interval between manure application and vegetable harvest. The cover crop takes up the nutrients, and both the cover crop and the amendments contribute to soil humus and nutrient levels at the time of the next vegetable planting.
On lower-fertility soils, be sure to provide organic sources of nitrogen, phosphorus, and potassium (NPK) for heavy-feeding cover crops like sorghum, sorghum–sudangrass, radish, and wheat. Well-fed sorghum–sudangrass can reach a height of nine feet in 75 days and smother weeds, whereas underfed sorghum–sudangrass is thin, yellowish, and weed-infested at the same age. Buckwheat, pearl, and foxtail millets are somewhat more tolerant to lower soil fertility levels, while cowpea, sunnhemp, cereal rye, and hairy vetch can be considerably more so. However, when soil fertility is low, all cover crops respond to compost and other slow-release nutrient sources with increased vigor, higher biomass, and better weed suppression.
Legumes can derive most of their own N through symbiotic root nodule bacteria (Rhizobium or Bradyrhizobium)—provided that the right bacteria are present! Use the correct seed inoculant for each legume cover crop to be sure that its N-fixing capacity is realized. Proper nodulation enhances legume competitiveness against weeds, especially when soil soluble N levels have been drawn down by heavy feeding cash crops. Vigorous, well-nodulated legumes also form strong associations with mycorrhizal fungi that enhance uptake of P, micronutrients, and moisture.
Feed the Cover Crop, Not the Weeds
One important caution about fertilizing cover crops: fresh manure and other materials that rapidly release a lot of soluble nutrients can compromise the cover crop’s ability to outcompete weeds. Liebman and Gallandt (1997) point out that, in soils with fairly low levels of soluble N (especially nitrate), N-fixing legume cover crops have a big advantage over most weeds and they can effectively shade them out. With high soluble N levels, this advantage is lost, and the weeds may gain the upper hand. In addition, fresh manure is itself often a major source of weed seeds.
Slow-release sources such as high quality compost are more likely to support vigorous cover crops without speeding the growth of nutrient-responsive weeds. If a “hot” material like fresh manure or chicken litter is the only organic fertility source available for restoring depleted soil, follow its application immediately with a nonlegume cover crop that can rapidly take up and stabilize the soluble N and outrun the weeds. Examples include cereal rye, radish, sorghum–sudangrass, and pearl millet.
Get a soil test from a competent lab to check nutrient levels before applying manure or compost, especially when restoring soils with a long history of conventional farming. A “dead” soil with little organic matter may also be nutrient-depleted, or it may actually have high or excessive P and K levels depending on past fertilizer applications. On a biologically-depleted soil with very high P and K, avoid manure applications and plant legume or legume–grass cover crops to suppress weeds, replenish N, and rebuild soil quality. Light applications of high quality compost or vermicompost (worm castings), or the application of compost tea or biodynamic field sprays, can reintroduce beneficial soil organisms that help rebuild soil quality. Soil tests can also help detect micronutrient deficiencies or pH extremes that might limit cover crop growth and favor those weeds that are adapted to these conditions.
Grow a Cover Crop to Maturity If—and Only If—it is a Good Stand
In order to gain the maximum benefits from a cover crop, grow it to maturity—full height, full heading with pollen shed in grains and grasses, and full bloom in legumes and other broadleaf crops. Prevent the cover crop from self-seeding by terminating it before seed or pod formation, unless a second generation of cover crop through self-seeding is desired. Growing the cover crop to the flowering/heading stage before terminating it maximizes biomass production and—in legumes—nitrogen fixation, prolongs and maximizes weed suppression and soil protection, provides extended habitat for beneficial insects, and—in the case of grass–legume bicultures—optimizes the C:N ratio for humus formation and slow-release of nutrients to the next crop.
A few weeds in a healthy, dense stand of cover crop will likely be outcompeted, and are usually not a reason to terminate the crop early (Fig. 6). However, if the cover crop stand is thin, uneven, and/or quite weedy (see the third photo in Fig. 4 for an example), the crop should be terminated before weeds have a chance to set seed or propagate through rhizomes, tubers, and other vegetative structures. Timely mowing can postpone seed formation by annual weeds, and can be used to extend the cover crop period if the field is not infested with perennial weeds that reproduce vegetatively.
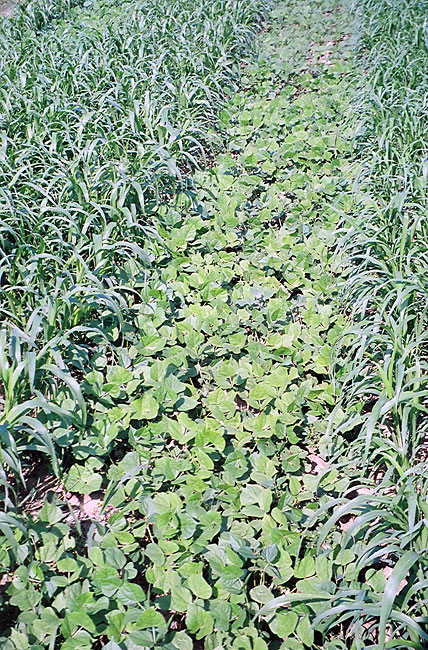
Figure 6. These young cover crops of sorghum–sudangrass and lablab bean (a tropical legume suitable for warm humid climates in the southeastern US) are sufficiently dense and uniform to compete effectively against the few weeds emerging with them. This stand should be allowed to grow until the grass begins to head in order to derive the maximum benefit. Mowing sorghum–sudangrass back to a stubble height of about one foot and letting it regrow has been reported to stimulate additional rooting, which could further enhance its weed suppressive effects. Figure credit: Mark Schonbeck, Virginia Association for Biological Farming.
This article is part of a series on Twelve Steps Toward Ecological Weed Management in Organic Vegetables. For more information on the use of cover crops in weed management, see:
References and Citations
- Grubinger, V. 2004. Farmers and their innovative cover cropping techniques [VHS tape/DVD]. University of Vermont Extension, Burlington, VT.
- Liebman, M., and E. R. Gallandt. 1997. Many little hammers: Ecological management of crop–weed interactions. p. 291–343. In L. E. Jackson (ed.) Ecology in agriculture. Academic Press, New York.