eOrganic authors:
Joel Reiten, Seeds of Change
John Navazio, Organic Seed Alliance and Washington State University
This is an Organic Seed Resource Guide article.
Carrot Seed
Author: Joel Reiten, Seeds of Change
Carrot seed crops are usually mature in late July in the Western Region. The king or top-most umbel is the first to ripen. The seed will turn from a dark green to brown and will actually begin to detach from the umbel, but because of the racemes, or little hooks that cover the seed, they latch together and stay with the umbel surface. The smaller umbels further down on the plant will ripen a few days later, but waiting until all of the lower umbels are ripe is seldom economically viable as this seed tends to be of lower quality and strong winds will begin to dislodge the seed from the king umbels, which is generally the best seed.
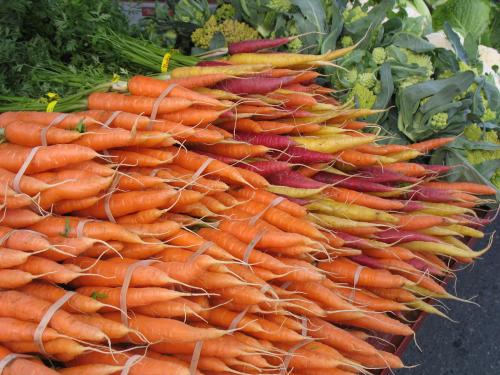
Bunched carrots on display at farmers market. Photo credit: Micaela Colley, Organic Seed Alliance
Carrot seed is one of the few crops where the endosperm is the first to fully form and the embryo forms later. Poor pollination, low plant fertility and Lygus bug damage can all effect the development of the embryo. Good quality seed is generally plump and heavy. One way to check initial seed quality is to thresh out a small sample in the palm of your hand using a fair bit of pressure on the seed. Good seed will remain intact while poor seed will crush and break apart.
When about 80% of the total seed has turned brown and detached from the umbel the crop is usually swathed and left to lay in the field for 2-5 days to allow the stems to dry so that the crop can easily be threshed. The crop is very vulnerable to high winds and rain at this stage so timing and a close watch on the weather is important.
Proper threshing takes an experienced operator. Because carrot seed is light in comparison to the stems and other trash created by combine threshing, it’s difficult to get a clean seed crop from a combine. Further seed cleaning with screens and air is necessary to get a clean seed crop. It’s not uncommon for the total weight that comes out of the combine to be less than 50% good, clean seed. Research and trials show that early harvest of carrot seed before the seed is physiologically ripe results in lower seed quality. Because the embryo forms last, early harvested seed is generally of poor germination.
Late harvest can happen but leaves the crop vulnerable to wind and rain damage. If the crop is small and cover is available, cut the crop at the proper stage and then move it onto paper or plastic under cover until it can be threshed. The stems will still have a fair bit of moisture so make sure to manually turn the crop to get it uniformly dry. Don’t pile the crop any more than 2-3 feet deep and try to keep the pile loose and fluffy to allow air flow through the crop. Supplementary air will also help to keep molds from forming on the mature seed.
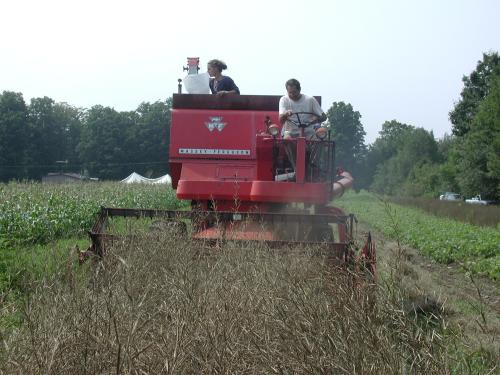
Field combine harvesting dry seed. Photo credit: Micaela Colley, Organic Seed Alliance
Onion Seed
Author: Joel Reiten, Seeds of Change
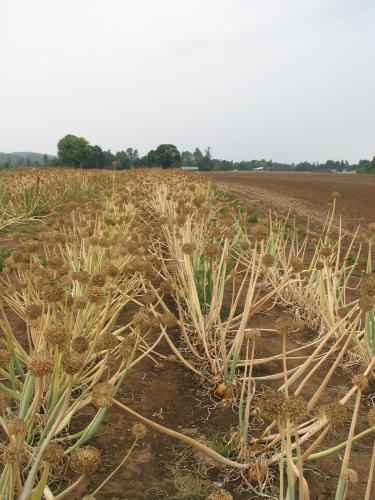
Onion seed field, Bejo Research Farm, Cottage Grove, Oregon. Photo credit: Micaela Colley, Organic Seed Alliance
Onion seed is formed within 50-2000 florets that are borne in a simple oval umbel 4-8 inches across on top of an elongated seed stalk. Because individual florets open over a two week period, seed maturity also develops over a two week period and the crop is very prone to seed shatter if not cut soon enough.
The mature seed of onions is a dull black color, hard and completely dry. A good rule of thumb is when there is a patch of black seed showing at the top of the umbel about as big around as a 50 cent coin, it’s time to cut the crop. Several different methods are used. The most common method is to cut the umbel leaving about 6 inches of the seed stalk attached and pile the material on paper in the field. Paper is used so that condensation does not form on the ripening seed. Some farmers now use ground cloth type materials under the crop and then cover the crop with plastic if rain threatens. Smaller crops can also be moved into an unused greenhouse or other building as long as it has good airflow. Make sure the piles are no more than 2 feet deep and kept loose and airy to allow good air flow. The later maturing seed will use the moisture from the seed stalks attached to the umbel to continue maturing.
Once all of the seed is mature threshing can begin. Check the seed for full maturity by biting or cutting into the seed from the lower parts of the umbel. The seed should be completely dry. If the endosperm is not fully ripe the inside of the seed will be soft or “doughy”. This soft seed is very easily damaged during the threshing process. Usually about 10-14 days in sunny field conditions allows the seeds to fully mature.
Onion seed needs to be threshed very carefully as the seed coat is very thin. Aggressive threshing with a combine often leads to microscopic cracks in the seed coat that greatly diminish storability. Combines are often equipped with rubber beater bars to minimize the damage.
Because onion seed shatters very easily, small amounts of seed can be extracted by beating the umbels on the inside of a plastic trash can. A great deal of seed generally shatters on the paper or other drying surface. This seed can be carefully swept up and cleaned with the rest of the seed.
A good, quick way to check onion seed for initial quality or to clean small parts of dry matter is to add the seed to a bucket of water. Good seed will sink. Poor seed and small plant material will float and can be poured off. Wet seed should be quickly laid out in a thin layer to dry with good air circulation.
Beet Seed
Author: John Navazio, Organic Seed Alliance and Washington State University
Seed Set
When table beet (Beta vulgaris) seed crops are produced under appropriate environmental conditions, flowering and seed formation usually starts anywhere from six to ten weeks after flower stalk initiation. As the flowering habit is indeterminate, flowering will continue until harvest or frost. There is continuous maturation of seed throughout the season from onset of flowering until harvest. Therefore, there is a percentage of beet seed that has set on any particular fruiting branch that will not be mature/be viable at the time of harvest. Conversely, the earliest seed to set will often mature several weeks before the bulk of the seed on any given plant has matured. This early maturing seed is usually of a high quality and will often have a very high germination rate. Loss of this early maturing seed to shattering or predation can occur as the bulk of the crop is maturing. One of the beet seed grower’s primary concerns is to determine when the maximum overall maturation has occurred, without losing a significant amount of the earliest maturing seed.
Signs of Seed Maturity
Because beet seed matures sequentially, the percentage of beet seed reaching full maturity at the time of harvest will usually not exceed 75% of the total seed crop. Cool, wet weather can often occur during the late season seed maturation period for beets in the Pacific Northwest. For this reason it is important for growers to closely monitor seed maturity and not harvest too early or too late. Early harvest may result in a percentage of seed that is not fully mature. Harvesting seed past the optimum time period may result in reduced yield and seed quality due to seed shattering and an increased incidence of seedborne diseases.
A standard method used to judge maturity of the beet seed crop is a visual assessment of the color of the seed ball (a multiple-seeded fruit resulting from the fused dry corky bracts of two or more flowers that occur at the same node). Harvest should occur when 60 to 80% of the seed balls on at least 90% of the plants in the field have turned a tannish-brown shade, typical of mature beet seed. Unfortunately this method may sometimes be inaccurate due to the potential effects of the environment or the genetic variation of the particular beet variety being produced. In a number of environments the beet seed balls will turn a darker shade of brown, sometimes before they reach full maturity. This often occurs with higher than usual levels of precipitation during the final weeks of seed maturation. This darkening may be due to saprophytic bacterial or fungal growth on the corky bract tissue of the seed balls. Depending on the pathogen it may not be harmful to the seed, but it seriously impedes visual assessment of beet seed maturity. There is also considerable variation in the degree of browning of the seed that occurs during the maturation process, with the seed of some beet varieties retaining greener hues than other varieties, even when fully mature.
In order to make a more accurate assessment of the maturity of the seed it is best to check the relative maturity of the endosperm of the seed. The endosperm of the seed is the white nutritive tissue that develops adjacent to the embryo and is of critical importance in all of the true flowering plants for its role in feeding the initial growth of the growing seedling. The endosperm, which grows concurrently with the embryo, must be fully developed to produce viable, fully mature seed that will grow vigorously and maintain a high germination percentage through its expected storage life. The starchy endosperm can be monitored through the maturation process by cracking open any one of the several seeds that occur within each beet seed ball. As is practiced with spinach seed, the best way to determine the maturity is to squeeze a small amount of the endosperm out of the cracked seed and visually inspect it. If the endosperm is viscous and appears translucent or milky, it is not close to maturity and will require at least 3 to 4 weeks to mature. Sometime after this the endosperm will start to appear grayish and waxy, what is often called “flinty,” but it is still not close to maturity. When the endosperm becomes “starchy” with a true solid white color and has a firm texture, the seed is very close to maturity. A majority of the seed, at least 70 to 75% of the seeds on a given plant, must be at this advanced starchy stage before considering harvest.
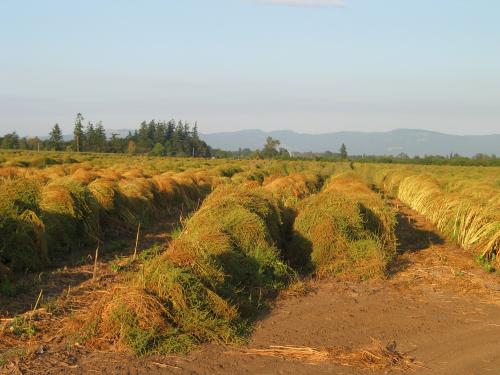
Windrowed beet seed field, Willamette Valley, Oregon. Photo credit: Micaela Colley, Organic Seed Alliance
Harvesting Techniques
Beet plants in full flower can have a stature of from 3 ft to 7 ft in height and can often cover a diameter of more than 3 ft on the ground. The commercial beet seed crop is rarely staked so there is a tendency for the crop to lean in all directions, thereby making mechanical cutting or swathing without causing excessive amounts of seed shattering nearly impossible. Because of this many growers elect to perform the initial harvesting of the crop by hand. Crews walk through the field pulling plants by hand and laying them into several well-placed windrows across the field. In some cases the harvesters use machetes to cut the remaining beet root mass from the plant to minimize the chance of getting soil in the seed during the subsequent threshing. Some growers choose to leave the root mass attached as the root may still supply some energy in the final ripening that takes place in the windrow. This initial harvesting process is timed to coincide with a subsequent period of fair weather for the “after-ripening” of the seed in the windrow.
The seed plants should be placed in the windrows in such a way that they get sufficient airflow to allow even drying even with heavy dew or light rains that may occur during this after-ripening. This is important as beet windrows are not commonly turned as seed easily shatters during turning. Depending on the importance or value of a particular beet crop it may be worthwhile for the grower to place the crop onto landscape fabric or some other comparable porous material in order to catch any seed that may shatter during this period. The need for porous material is to insure that any precipitation or moisture accumulation will quickly move away from any seed.
The plants should remain in the windrows for a week to 10 days. Threshing can be done either by a stationary thresher or a self-propelled combine that is manually fed. Threshing should be done early in the day, mid morning in most climates, as light dew on the plants will prevent much of the potential shattering that can occur when the plants are picked up for threshing. The moisture can also lessen the amount of stems that break and lessen the size of the broken pieces that occur during threshing, thereby saving much time in subsequent seed cleaning steps to remove them. Threshed seed should then go through an initial screen cleaning or “scalping” to remove large leaf tissue, stems, and soil clods that can hold moisture. Drying the seed crop should occur in a well-ventilated warm space with additional heat added as necessary.